
How to Track HoneyBook Leads in GA4
Are you a Honeybook user struggling to understand where your online leads are coming from? While Honeybook provides the perfect platform for streamlined workflows, measuring its magic requires the power of a digital analytics tool like Google Analytics 4 (GA4).
Using these two tools together gives you the ability to:
Discover which marketing campaigns brought users to your lead form
See which campaigns have the highest/lowest lead form completion rate
Analyze what pages people visit on your website before and after viewing the lead form
View how many people leave your lead form before completing
Create a seamless user experience as your users navigate from finding your website to converting
Blog Overview
In this blog post, you’ll learn how to track Honeybook leads in Google Analytics 4. Click the links below to skip ahead to these sections.

Actionable Insights Without the Wait
Don’t have time to DIY? Boost your HoneyBook leads with insights from Google Analytics—in just 1 week with my HoneyBook and Google Analytics integration set up service.
I handle the complex setup so you can focus on your business.
What is Honeybook?
Honeybook is a project management and client relationship management (CRM) platform for creative professionals and small business owners. It helps businesses streamline their workflows, get paid faster, and deliver exceptional (and consistent!) client experiences with features like:
Proposal and contract creation: Create professional proposals and contracts that are easy for clients to sign.
Invoicing and payment processing: Send invoices and accept payments online.
Project management: Manage projects from start to finish with tasks, deadlines, and communication tools.
Client communication: Stay in touch with clients through email, chat, and video calls.
Automated workflows: Automate tasks such as sending reminders and collecting feedback.
Lead capture and qualification: Streamline your lead generation process with customizable Honeybook lead forms. Collect important information, pre-qualify leads, and even schedule appointments instantly, all within a seamless website experience.
In this blog, I’ll focus on the lead capture feature.
Why Track Your Honeybook Leads in GA4?
Google Analytics 4 (GA4) is the latest version of Google Analytics. It offers a flexible way to track website user behavior—including interactions with your embedded Honeybook lead forms.
Tracking your Honeybook leads in GA4 is useful for several reasons:
Get a complete picture of your marketing funnel: GA4 tracks the entire user journey, from the first visit to your website to when they become a paying client. This helps you see where your leads are coming from, what they're doing on your website, and where you're losing them.
Measure the effectiveness of your marketing campaigns: GA4 allows you to track the performance of your marketing campaigns across multiple channels, such as social media, paid advertising, and organic search. This helps you see which campaigns are driving the most leads and which ones need to be adjusted.
Make data-driven decisions: With GA4, you can get insights into your audience and their behavior. This information can be used to improve your website, your marketing campaigns, and your overall business strategy.
Why You Should Embed Your Lead Form on Your Website
Embedding your Honeybook lead form directly on your website provides a seamless experience for your potential clients. They can complete the form without having to leave your site, which increases the chances of conversion.
Here are some additional benefits of embedding your lead form:
GA4 Integration: Track your lead form users with customized tracking on our website pages.
Improved user experience: An integrated form provides a more positive user experience for your visitors.
Increased conversion rates: Making it easy for people to submit leads will likely lead to more conversions.
Branding consistency: An embedded form keeps your branding consistent throughout the lead capture process.
How to Embed Honeybook Forms on Your Website
Embedding your Honeybook forms is a simple process that takes less than 5 minutes.
The steps to embed your Honeybook form differ based on the HB form type—lead form vs contact form. I’ll show you the steps for both below.
What’s the Difference Between Honeybook Lead Forms and Contact Forms?
There are two types of forms in Honeybook: lead form and contact form. They offer different ways to capture potential clients’ information.
Contact forms are perfect for basic inquiries on your website and gathering minimal information like name and message. They initiate further conversation through email.
Lead forms, however, are more powerful: you can customize them with service selections, scheduling options, and even payment integrations. This lets potential clients take more action, like booking and payment.
💡Think of contact forms as a friendly knock on the door, while lead forms offer a full invitation to come in and explore. Which you choose depends on whether you want a simple greeting or a chance to turn visitors into engaged leads.
How to Embed a Honeybook Lead Form
Honeybook hasn’t given us an embed code for lead forms, so we’ll need to create an iframe to add the form to our website.
💡An iframe (or inline frame) is HTML element that’s used to insert other websites onto your website. This code will act as the bridge between your Honeybook lead form (that lives on the HoneyBook domain) and your website.
Access Your Honeybook Account: Start by logging into your Honeybook account and head to the Tools section. Under Lead Capture, click on Lead Forms. Here, you'll find a list of lead forms you've created.
Select Your Lead Form and Copy the URL: Choose the lead form you want to add to your website. Click on 'Share' and copy the public link URL provided.
Generate the iframe Code: Now, it's time to integrate your lead form into your website with the use of an iframe. Go to an iFrame generator, paste the Honeybook lead form URL, and click on 'Generate your iFrame.' Copy the generated iframe script.
I use https://www.iframe-generator.com/ to create iframes on my website. Make sure the generator you choose isn’t adding malicious or suspicious code to your snippet.
Embed the iframe Script on Your Website: Paste the copied iframe script into an embed block on your website.
Preview and Test: Preview your website to ensure the lead form appears seamlessly. Test the form to confirm that it functions as expected.
How to Embed Honeybook Contact Form
Honeybook has given us the embed code for lead forms, so we don’t need to create our own iframe.
Access Your Honeybook Account: Start by logging into your Honeybook account and head to the Tools section. Under Lead Capture, click on Contact Form.
Copy the Code: Click on Publish in the upper right hand corner. A popup will appear with the code you’ll need to add to your website. Click on 'COPY CODE'.
Embed the iframe Script on Your Website: Paste the copied code into an embed block on your website.
Preview and Test: Preview your website to ensure the lead form appears seamlessly. Test the form to confirm that it functions as expected.
How to Track Honeybook Leads in GA4
My preferred way of implementing Google Analytics is with Google Tag Manager because it gives me a lot of flexibility and allows me to tag the same components of my website for different martech (analytics, pixels, ads, social media, etc.) which saves me a lot of time. So that’s the method I’ll walk you through in this section.
Here are the steps for setting up the Honeybook integration with GA4:
How to Track Honeybook Leads Using Google Tag Manager
Go to your Google Tag Manager account. View this blog for how to set up GTM if you don’t have an account already.
Create a new Google Analytics: GA4 Event tag. It should look something like this:
GA4 Honeybook Event Tag Configuration:
Tag Type: Google Analytics: GA4 Event
Event Name:
generate_lead- This is Google’s recommended event name for lead conversions.Set the trigger to your thank you page (the page the user goes after completing your form. You’ll need to set this up in your HB form settings).
Preview and test your changes. If the tag is working correctly, you will see your tag fire on the thank you page once you fill out your form on your website in the GTM debugger view and the GA4 Debug View. See my screenshots below for how they should appear. You can learn more about the GTM debugger in this blog post or this video if you prefer video tutorials.
Publish your changes in GTM.
Once the integration is set up, your Honeybook leads will be automatically tracked in GA4. You can then view reports on your leads in the GA4 interface after Google Analytics 4’s 24-48 hour processing time.

Optional Enhancement: Track Honeybook Form Impressions
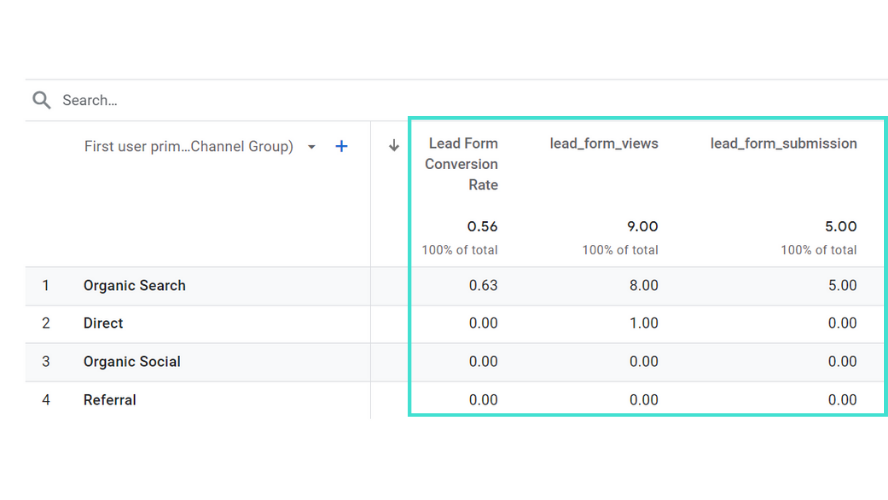
Want more granular lead form tracking? While we can’t track anything that is happening inside of the iframe (because its a third-party website), we can use some GTM magic to track when a user sees a certain percentage of the form, and count that as a lead form impression. The nice thing about this additional event is that we can create a lead form completion rate calculated metric with it in GA4 using generate_lead events / lead impression events.
Here’s how the data looks in GA4 once its set up. In this table, you can analyze which user traffic channel contribute to the Honeybook lead metrics.

Key Lead Generation Metrics at Your Fingertips
My HoneyBook + Google Analytics 4 dashboard helps you analyze key metrics with a user-friendly interface to quickly highlight which marketing efforts drive more leads.
With data points curated by a Google Analytics expert with 10+ years of experience, it's the perfect tool for businesses looking to maximize their marketing ROI.
How to Track Honeybook Lead Impressions Using Google Tag Manager
Create a new Google Analytics: GA4 Event tag. It should look something like this:
GA4 Honeybook Event Tag Configuration:
Tag Type: Google Analytics: GA4 Event
Event Name: lead_form_viewed - This is what I named mine, but you can name it whatever makes sense for you.
Event Parameter: lead_form_views - This is what I named mine, but you can name it whatever makes sense for you.
Set the value to 1
Set up your trigger. It should look something like this
Selection Method: CSS Selector
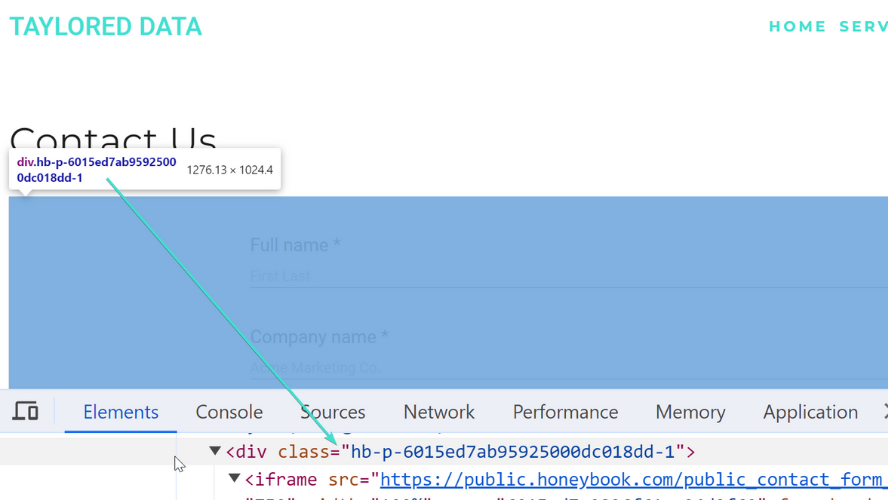
Element Selector: This should be your Honeybook div’s class name with a period (“.”) in front of it. Scroll down here for details on where to find your div class name
When to fire this trigger: Once per page
Advanced > Minimum Percent Visible: I left mine at 50% but you could go lower or higher depending on how much of the form you want the user to see before it counts as a lead form impression.
You’ll also want to edit your generate_lead event tag and add an event parameter:
Event Parameter: lead_form_submission. - This is what I named mine, but you can name it whatever makes sense for you.
Set the value to 1
Save your changes
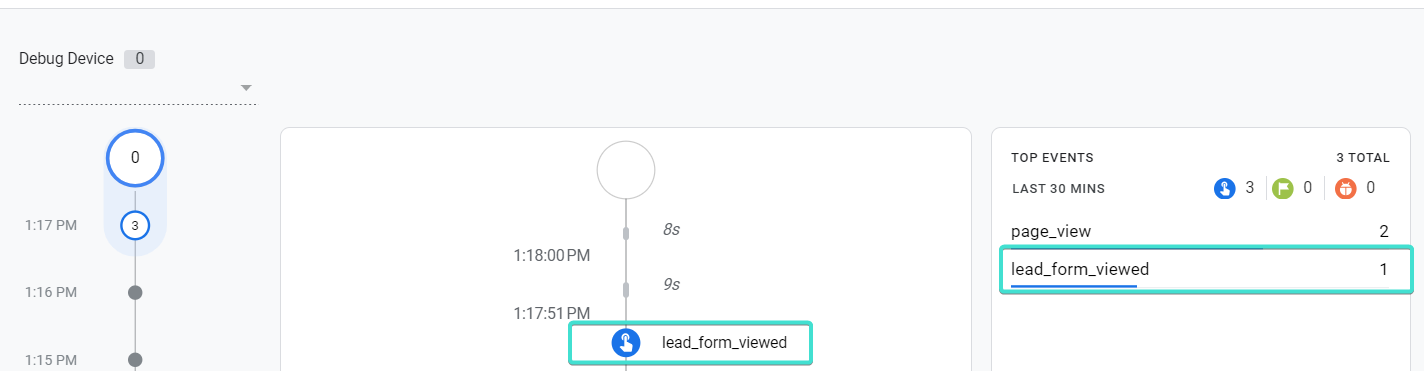
Preview and test your changes. If the tag is working correctly, you will see your tag fire when the form is visible at the percentage you set in your trigger. See my screenshots below for how they should appear in the GTM debugger view and the GA4 Debug View.
Publish your changes in GTM.
Once the integration is set up, your Honeybook leads will be automatically tracked in GA4. You can then view reports on your leads in the GA4 interface after Google Analytics 4’s 24-48 hour processing time.
💡Note: You can find your Honeybook div class name in two ways. You can find this on your website by opening your website Developer Tools or by looking at the embed code Honeybook gives you in the form settings when you click on Publish in the upper right hand corner. It may start with “hb-”

How to Create Custom Metrics in Google Analytics 4
Go to Admin > Data Display > Custom definitions > Custom metrics.
Click Create custom metric.
Create the lead_form_views custom metric
Metric Name: lead_form_views - This is what I named mine, but you can name it whatever makes sense for you.
Scope: Event
Event Parameter: lead_form_views - This needs to match the exact event parameter you set in GTM.
Unit of measurement: Standard
Create the lead_form_submission custom metric
Metric Name: lead_form_submission - This is what I named mine, but you can name it whatever makes sense for you.
Scope: Event
Event Parameter: lead_form_submission - This needs to match the exact event parameter you set in GTM.
Unit of measurement: Standard
How to Create Calculated Metrics in Google Analytics 4
In GA4, we can combine custom metrics or predefined metrics in formulas to create calculated metrics. For example we can create a calculated metric to determine our Honeybook form completion rate. Here are the steps to create this calculated metric:
Go to Admin > Custom definitions > Calculated metrics.
Click Create calculated metric.
Create the lead form conversion rate custom metric
Name: Lead Form Conversion Rate - This is what I named mine, but you can name it whatever makes sense for you.
Formula: {lead_form_submission}/{lead_form_views} - This needs to match the exact event parameter you set in GTM.
Unit of measurement: Standard
Want to see all of your essential lead generation metrics in one place? Download my HoneyBook and Google Analytics dashboard! The dashboard includes intuitive charts that display your HoneyBook lead conversion rate, funnel, HoneyBook lead submissions, and more in one user-friendly report.
Additional Tips for Tracking Honeybook Leads in GA4
Use UTM parameters: When you create marketing campaigns, use UTM parameters to track the traffic from those campaigns to your Honeybook lead forms. This will help you see which campaigns are driving the most leads.
Not sure how to use UTM parameters, learn how to track your campaign with UTM parameters in this guide and get a free template to make tagging your campaign URLs faster.
Set up GA4 conversions: Conversions in GA4 allow you to highlight important actions that you want users to take on your website, such as submitting a lead form. Once you have set up conversions, you can track how well your website is performing in achieving those goals.
Segment your data: Segmentation allows you to break down your data into smaller groups so that you can see how different groups of users are behaving. For example, you could segment your data by traffic source, location, number of visits to your website, and more.
By following these tips, you can track your Honeybook leads in GA4 and gain valuable insights into your marketing efforts. This information can then be used to improve your website, your marketing campaigns, and your overall business.
Summary
If you’ve made it this far, you have hopefully been able to:
Embed your Honeybook form on your website
Implement Google Analytics lead form analytics tracking through Google Tag Manager to see your Honeybook form conversions in GA4.
I hope you found this tutorial helpful and use these same principles to track all of the important conversion points on your website so that you can capture your business’s KPI in Google Analytics 4.
How to Implement GA4 Lead Tracking on Honeybook Forms
Gain faster insights with a hassle-free setup from a Google Analytics consultant with over 10 years of experience! As a seasoned expert, I can help you:
Streamline your marketing efforts: Gain valuable insights into your customer behavior and optimize your campaigns with a custom lead generation dashboard.
Make data-driven decisions: Use your enhanced Google Analytics set up to inform your business strategies and drive more HoneyBook leads.
Improve your ROI: Track the effectiveness of your marketing initiatives and allocate resources accordingly.
But don’t just take my word for it. See what my clients have to say about their experience working with me:
Ready to take your business to the next level? Book a discovery call today and let me help you unlock the power of Honeybook and Google Analytics without all the trial-and-error!
Google Analytics Solutions for Small Businesses


