
How to Add Google Tag Manager to Squarespace
One of the challenges I had when first working with Squarespace was adding Google Tag Manager to my website. Unlike CMSs like WordPress that rely on simple plugins, Squarespace requires a unique approach with code snippets.
I faced this challenge firsthand, so you don’t have to! In this blog post, I'll guide you through the process, saving you time and ensuring a smooth installation of Google Tag Manager on your Squarespace website in less than 20 minutes. Don't miss out on the insights and optimizations waiting for you – let's get started!
💡Prefer video tutorials? Watch my GTM + Squarespace video below.
Steps to Adding GTM to Squarespace
Set Up Your Google Tag Manager Account (skip if you already have a GTM account)
Add Your Google Tag Manager JavaScript Snippets to Squarespace

Sell Smarter with Squarespace
Maximize your Squarespace website's potential. My expert Google Analytics integration service ensures accurate tracking, valuable insights, and data-driven decisions. Book a free consultation to get started.
First, set up your Google Tag Manager account.
Step 1: Sign into the Google Tag Manager site

Step 2: Create Account

Step 3: Set Up Account and Container


Step 4: Accept Google Tag Manager’s Terms of Service Agreement

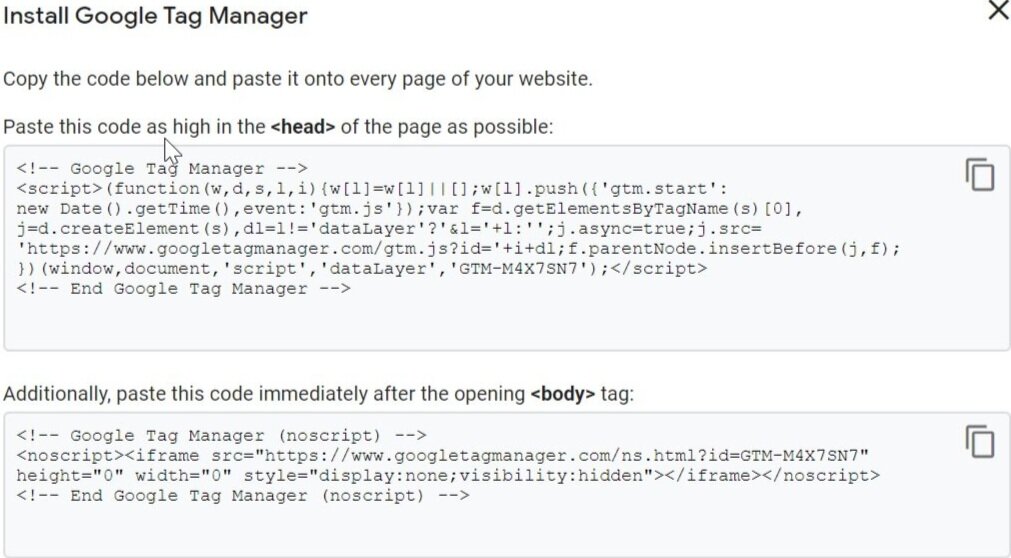
Step 5: Get Google Tag Manager JavaScript Snippets that you'll need to add to our Squarespace site
To add GTM to your Squarespace site, you will need to have the Business or Commerce plan. In a future blog, I’ll give instructions on how to add Google Analytics to your site if you don’t have the Personal plan.
Step 1: Go to Settings>Advanced> Code Injection in Squarespace

Step 2: Paste the GTM head snippet into the header field in Squarespace

Step 3: Paste the GTM body snippet into the footer field in Squarespace and click save

Now that we've added our Google tag manager snippets to the site, let's validate that it's working as expected using GTM’s built-in debugger.
Step 1: Click on Preview in Google Tag Manager

Step 2: Refresh Squarespace site and Validate that the correct GTM snippet was installed on the site

Step 3: Click the Submit button at the top right corner of the screen

Step 4: Add a Detailed Version Name and Description and Publish!

Unlock the power of advanced tracking with GTM. Book a discovery call for a personalized Google Tag Manager implementation. My Google Analytics and Squarespace integration includes ecommerce tracking, form tracking, and other custom events to ensure you’re tracking the key user interactions on your website.
Check out my video if you’d like to see this in action.
Google Analytics Solutions for Small Businesses


